NOTE: There’s a version 2.0 of this project! Follow this link for information on Enchanted Rose 2.0.
My daughter is in Beauty and the Beast this spring. So I thought it’d be a good opportunity to test my Internet of Things (IoT) skills using Arduino, Bluetooth and iOS, and build a remote-controlled Enchanted Rose prop which has variable-color lighting and can drop petals on cue. I contacted the director, volunteered to make the prop, and she was all for it. Read on to see how you too can construct one of these.
UPDATE September 2022: Enchanted Rose 2.0
The plans which follow are version 1.0, based on Arduino, Bluetooth, and a dedicated iOS app written in Swift to control the prop. But the Bluetooth shield in this project has since been discontinued, and the iOS app, while nice and functional, is hard to distribute to others and troubleshoot. Apple is constantly upgrading (breaking compatibility) for its Swift programming language, making it a headache to get running on each instance.
In the roughly 4 years since I published this piece, I’ve heard inquiries from multiple production managers (UK, CA, CO, NY and more) who want to acquire or rent such a prop. Rather than continue with support on this, I’m building a newer version which will be available for rent.
That of course also means the new design must be shippable, not as delicate as this version 1.0 design is. The 1.0 design is being tossed; the 2.0 design will employ a web server powered by a Raspberry Pi.
Follow me on Twitter to see when the version 2.0 is available (ETA early October 2022.) If you’d like to rent the 2.0 version of the prop, reach out, and please include your production date and ship-to address, and we can discuss.
So, to summarize: While version 1.0’s design described in this two-part blog series might help guide you in building your own remote-control Enchanted Rose, it employs a few parts and software components that are no longer available. I cannot provide any tech help on the Swift control app, as there are just too many idiosyncracies and configuration issues. The 2.0 version I’m building at present is a different design, based on a Raspberry Pi controlling solenoids to drop the petals. This approach will be far more durable for shipment, and should be plug-and-play for any production.
In the 4 years since I wrote up this Enchanted Rose prop build, I've had several inquiries from Beauty & Beast productions: UK, Canada, CA, CO, NY. Have decided to build #EnchantedRose 2.0, based on #raspberrypi & solenoids, durable enough to ship/rent.https://t.co/SNwREeuMLu
— stevemur (@stevemur) September 18, 2022
Now back to the 1.0 article.
This is a two-part article. Lessons are learned along the way, so be sure to read the complete two-part article (Part II here) before proceeding and/or sourcing parts. Some of the design decisions were changed in final implementation; this is more in narrative form with learning lessons along the way.
Part 1 : Basic Prop Setup
At this writing, the vast majority of the prop is working, but it’s not yet fully finished. Some aesthetic touches remain. The performances are still a couple months away, so I’ll be updating this post as the project nears completion.
Here’s a demo of the project in its current stage. This stage uses a v2 mechanism to drop the petals.
Figuring out the best petal-dropping mechanism was actually the most time-consuming part of this project. I found it relatively easy to get an app to control servo motors using Bluetooth, but the question is — how to do you translate servo-motor turns into petal drops?
I originally started out with the idea of stiff piano wire, attached to servo motors in the base moving up and down and the petals having small cocktail straw segments hot-glued to them. This worked, if the prop was set perfectly.
But for various safety reasons (and especially after my wife reminded me that a fifth-grade crew was going to be operating and re-setting this prop), I switched to a version 2.0 design of tiny rod magnets mounted on springs in the “bud,” pulled by fishing line connected to the servos.
There’s a parts list and notes below, with links to the complete source code. Hopefully this this may help other performances that might have this same prop need.
The prop has three basic components:
- Physical Prop (Rose and Dome)
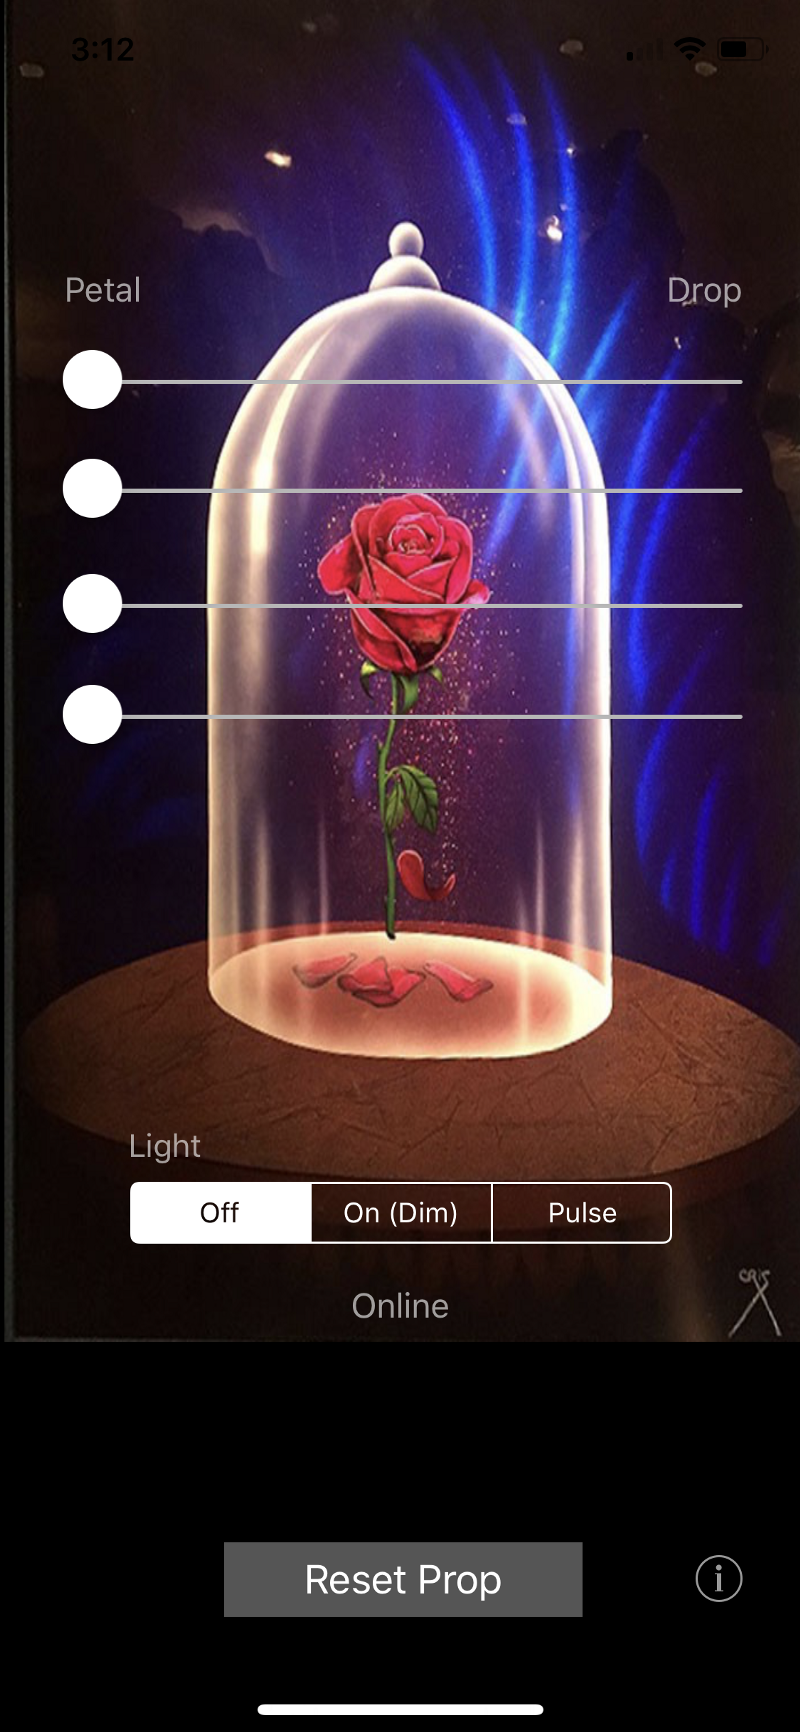
- Control App (iOS)
- Arduino Microprocessor Software
The app “speaks” to the prop via Bluetooth, ably powered by this BLE Shield from Red Bear Labs:
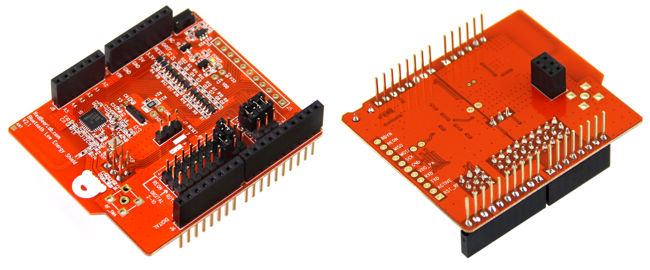
UPDATE (November 2019): I believe the above model, which I used in this project, is now discontinued. If you insist on sticking with Arduino and Bluetooth, you might try other Bluetooth shields, like this one: https://www.adafruit.com/product/2746. You can see a demo of this shield in action here: https://www.youtube.com/watch?v=5ZQ5JJTwONc. You will have to adjust the Swift code included in this blog post to include the new board-specific libraries. Swift has changed considerably since the release of this article. That’s in part why I’d recommend you consider a Raspberry Pi – Wifi approach rather than and Arduino/Bluetooth/iOS-app approach.
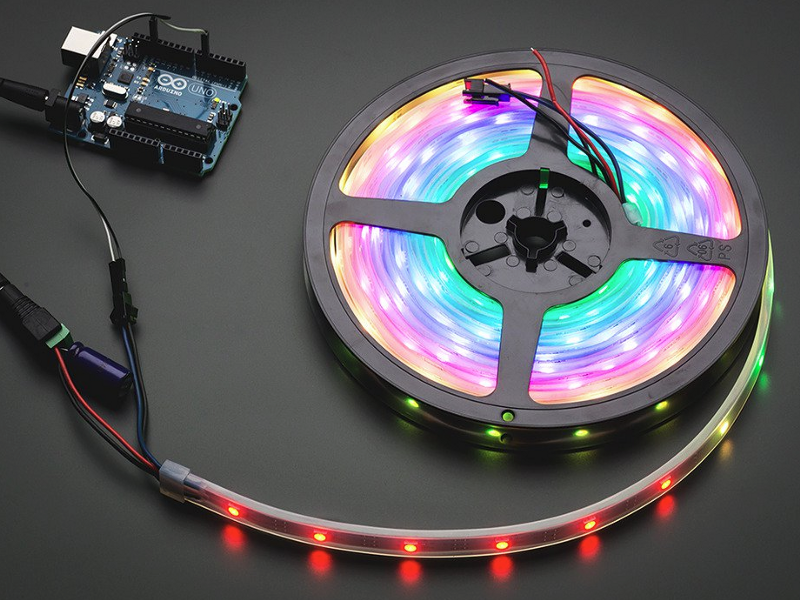
In addition to servo motors which control the falling petals, it has a variable-color LED-strip for optional magical effects on cue:
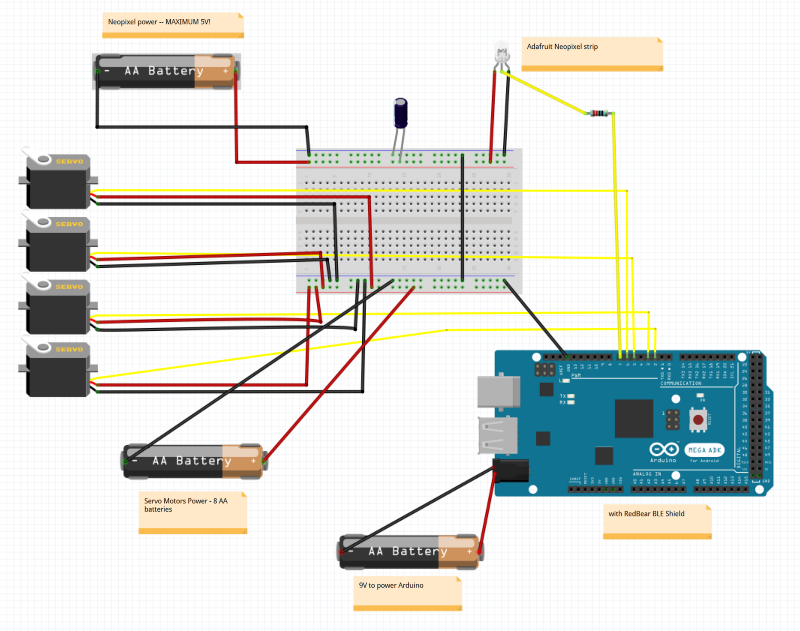
Parts List, v1.0
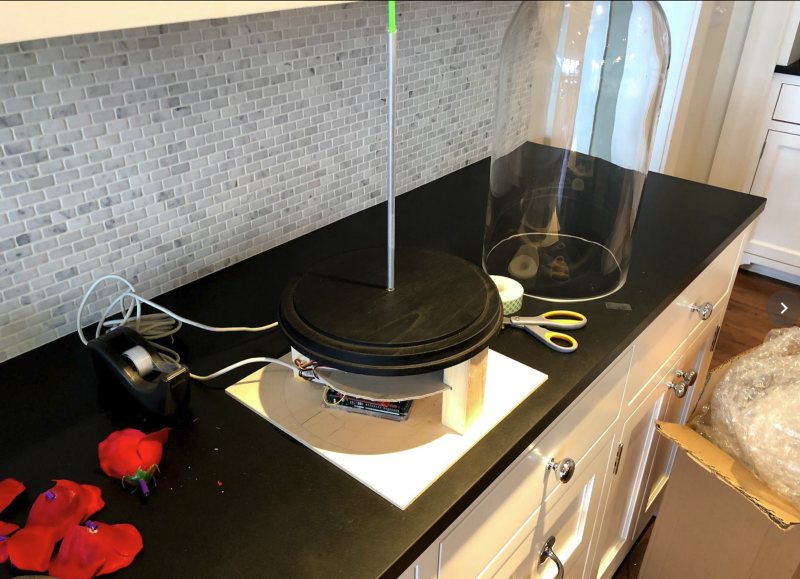
- Display dome (“cloche”) with wooden base
- 2–3 large Silk roses (will cannibalize some to get petals)
- Arduino MEGA — While an UNO will work just fine if you don’t want the Neopixel accent light, I chose a MEGA here because the NeoPixel and BLE shield together don’t supply enough available pins to control 4 separate servo motors. (UPDATE April 2021: I’d opt for a Raspberry Pi Zero W, since it can speak WiFi and run Python and small websites.)
- Wood for base: 3 12×12″ thin plywood sheets, 1 2 foot segment of 1×1
- 3M Mounting Tape and hot glue gun
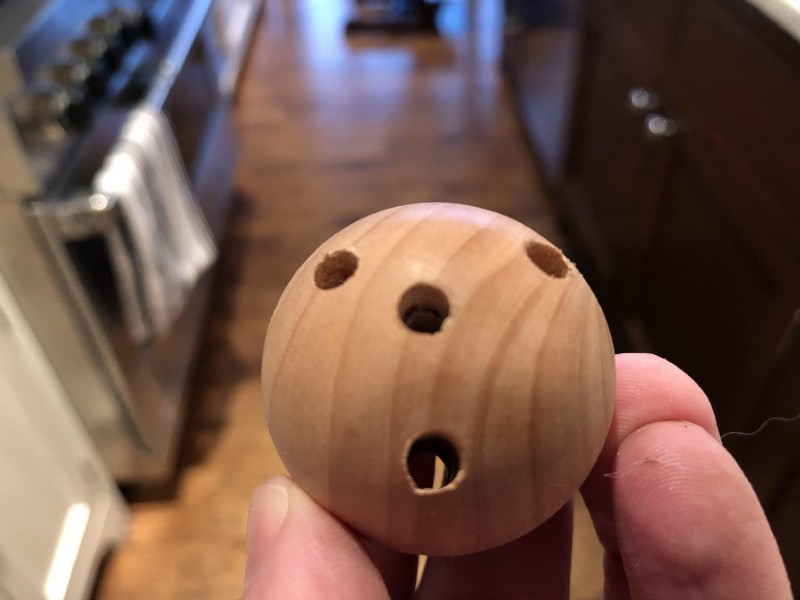
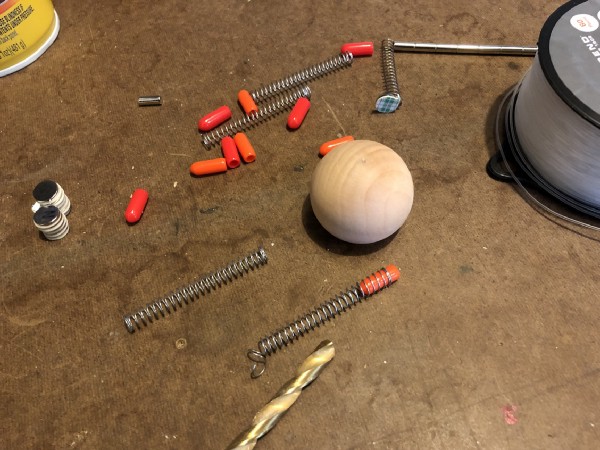
- Coffee straws (if you stick with version 1 design), OR four small rod magnets, 1 1/2″ wooden ball and metal washers (if you use version 2 design)
- Electronics “breadboard” and jumper wires
- 17 AA batteries, yes 17. You’ll need 3 for the Neopixel lighting strip (and no more!), 8 to power the servos, and 6 to power the Arduino & BLE Shield. If you want to be fancy, I’m sure you could use a regulator to get from the 9V down to the 5V for the Neopixel, but after frying one of them, I wasn’t interested in risking it.
- 3-AA battery case (1)
- 6-AA battery case (1)
- 8-AA battery case (1)
- Red Bear Labs Bluetooth Low Energy (BLE) shield see note above – discontinued; you’ll most likely have to use a different BLE shield (Update April 2021: Not needed if you go with the Raspberry Pi approach, since the communication from controller to prop would be via Wifi.)
- Adafruit NeoPixel strip (60 LEDs, 1 meter)
- 18″ Aluminum tube
- 4 springs, about 1/8″ diameter by 1 1/2 inches — not too stiff. I purchased my springs from a local hardware store; the spring from inside a ballpoint pen might also work as well.
- 4 silicon/rubber thread covers
- High-strength (e.g., 60lb) fishing line
- 4 servo motors (Update April 2021: With a Raspberry Pi Zero W approach, I’d definitely opt for a motor controller board, since controlling servos via software on the Raspberry Pi ends up with all kinds of timing issues and motor jitter; you really want a piece of hardware to take control of the Pulse Code Modulation. The right board for the job is this one by Adafruit.)
- 1000 mu capacitor
- 300 ohm resistor
- Sound baffling and/or black felt curtain for the base
- (optional) 3 toggle switches for power — alternatively, you can just remove a battery from each pack
- Soldering iron and solder
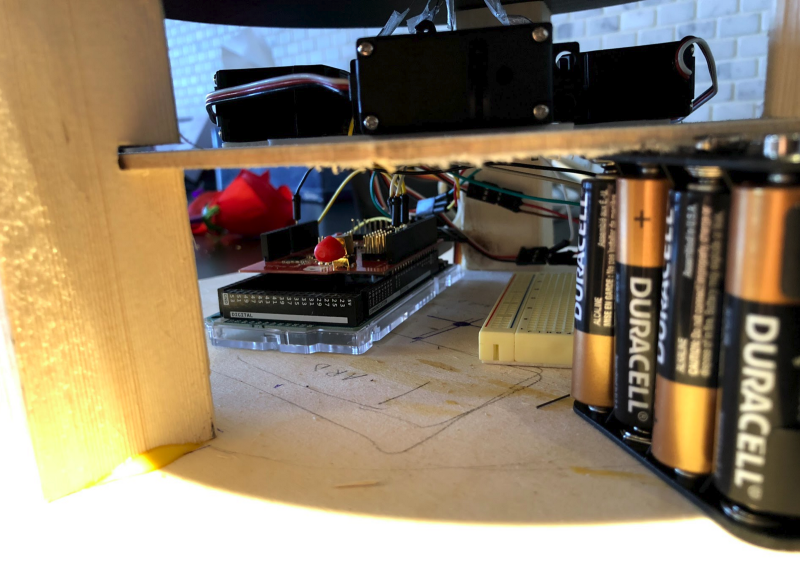
Physical Prop
What actually causes the petals to drop are four servo motors located beneath the base. They move string that temporarily pulls down a spring-mounted magnet through the stem. This breaks a magnetic connection between the magnet and a washer hot-glued to the petal, causing petals to drop. After a second or two, the servo motor returns to its normal position (with the spring resetting the magnet to being just 1mm proud of the hole).
To assemble, find the exact center of the dome’s base, and drill a hole just large enough for the aluminum tube. Build a supporting structure which goes under the base, which consists of a shelf for the servos and room for the electronics underneath. Next, affix the servos to the “servo shelf” — I used wall mounting tape from 3M for this purpose. Run piano wires from each servo up through the aluminum “stem.”
The original design was to have the petals attached to the wire by means of small straw segments. When the piano wire withdrew 1/2″ or so into the tube, the petals should fall.
While this simple mechanism worked, I found it was extremely difficult to “reset” for every performance with the wires bunched so tightly together at the flower.
So the final version uses the spring-loaded magnet technique, which works great. Take the silicon/rubber thread covers, drill a very tiny hole in the bottom, thread high-test fishing line through, and tie a double knot at the end. Then, push the rod magnets into the thread covers, and thread the thread covers into the springs, as shown above.
Small metal washers are then hot-glued to individual petals. When the fishing line is pulled by the servo, the magnet withdraws into the stem and separate from the washers on the petals, causing the petals to fall off.
An electromagnetic way of attaching/dropping petals would also work, but for pragmatic reasons, I didn’t pursue that approach: the performance is 1–2 hours long, and I worried about the batteries giving out before the cue. With the magnet and fishing line approach, the petals can stay attached without power.
Control App (iOS)
- Written in Swift 4 (XCode) and published straight to the device.
- You’ll need a Mac and the IDE XCode (free at this writing). You do not need a developer program license, since you’ll be publishing the app straight to your iOS device (works with both iPhone and iPad.)
- You can get the source code from Github here: https://github.com/stevemurch/EnchantedRoseBLE
- This source code requires you to install the CocoaPod for the color picker. As with all Cocopod-based projects, you’ll need to open the .xcworkspace file, NOT the standard project file, to get the app to compile.
- This source code assumes that your servos are linked to pins 2, 3, 5 and 6.
Arduino Software for the Microcontroller
- Written in Arduino Sketch Editor and deployed to the Arduino via USB cable.
- You can get the code from Github here: https://github.com/stevemurch/EnchantedRoseProp
Gotchas
- You will RUIN your $35 Neopixel strip if you accidentally power it with more than 5V! I learned that lesson the hard way; in my haste I wired in the Neopixel strip to the 12V power rail being used for the servos. That permanently fried the light strip instantly. Don’t do that. Instead, create another 4.5V power rail, using 3 (and only 3) AA batteries. The Neopixel strip is awesome, but very sensitive to too much voltage. Be sure to read the Neopixel documentation that shows how to wire in a 1000 mu capacitor and 300 Ohm resistor.
- The servo motors however require much higher voltage to operate smoothly (12V.) So I powered these entirely separately, using a separate power rail on the breadboard. Make sure you wire the common grounds together, and both back to the Arduino.
- The Neopixel documentation suggests you power on the Arduino before powering on the Neopixel. So we’ll be powering up in the following order: (1) Board, (2) Servos, (3) Neopixel, (4) Launch app. If you fail to do it in that order, the app might try to connect before a signal is available from the prop and timeout. Simply relaunch the control app and it should discover the device.
- Connection is excellent, and works through walls and for more than 40 feet. If connection is lost, simply restart the app.
- It turns out there is a known conflict between the Neopixel strip and servo motors (has to do with timing/interrupts). The fix involves using a custom servo library which limits the Uno to just two servos. So, I decided to upgrade to an Arduino MEGA to get more servo ports. I also used the custom library for servos located here: https://learn.adafruit.com/neopixels-and-servos/the-ticoservo-library
- This source code assumes that your servos are linked to pins 2, 3, 5 and 6 (note: there’s no 4), and that your Neopixel control pin is 7. All are digital pins.
Basic wiring diagram — note the batteries are just representative; each source has different voltage requirements.
At current writing, all servos and lights work, including the ability for stage crew to set the lighting color. I’m now working on improving the physical petal dropping, by making it easier to re-set (done, and Github code reflects that.) UX changed slightly from the screen below — I changed it to four pushbuttons, one for each petal.


Read more… Part II: Finishing Touches
hello good afternoon hope all is well,
would you make a video demonstrating the process of how all this is done from start to finish, we are working on a school project and unfortunately, I don’t have time to build this on my own. we could pay you to send us a video of the process.
Thanks for your interest, but sorry, the second version of this device is already built (and sold), and I can’t make a video at this time.